Rails LTI Tool Provider
This tutorial is intended to help you understand how to write a Tool Provider that works with a Tool Consumer like Canvas. We have created a basic Ruby on Rails application that implements a basic calculator. By following the steps below, you can take the code for the stand-alone calculator, or your own Rails application, and make it available to run from within an LTI-compliant LMS like Canvas.
This tutorial assumes that you have read through the basic steps. for creating an LTI-compliant application, and that you have at least a little familiarity with Ruby on Rails.
Step 1:
Add this Ruby
Gem to the Gemfile of your Rails
application.
This helps in performing most LTI tasks
such as validating and authenticating LTI requests.
gem 'ims-lti', '~> 1.1.8'
Step 2: Before tool consumers can send a request to your tool, they will have to add your app. To do so, they need a key and a secret. Create a new config file config/lti_settings.yml, and add a key and a secret to that file. The lti_settings.yml file should contain the following:
production:
calculatorkey: 'FirstSecret'
development:
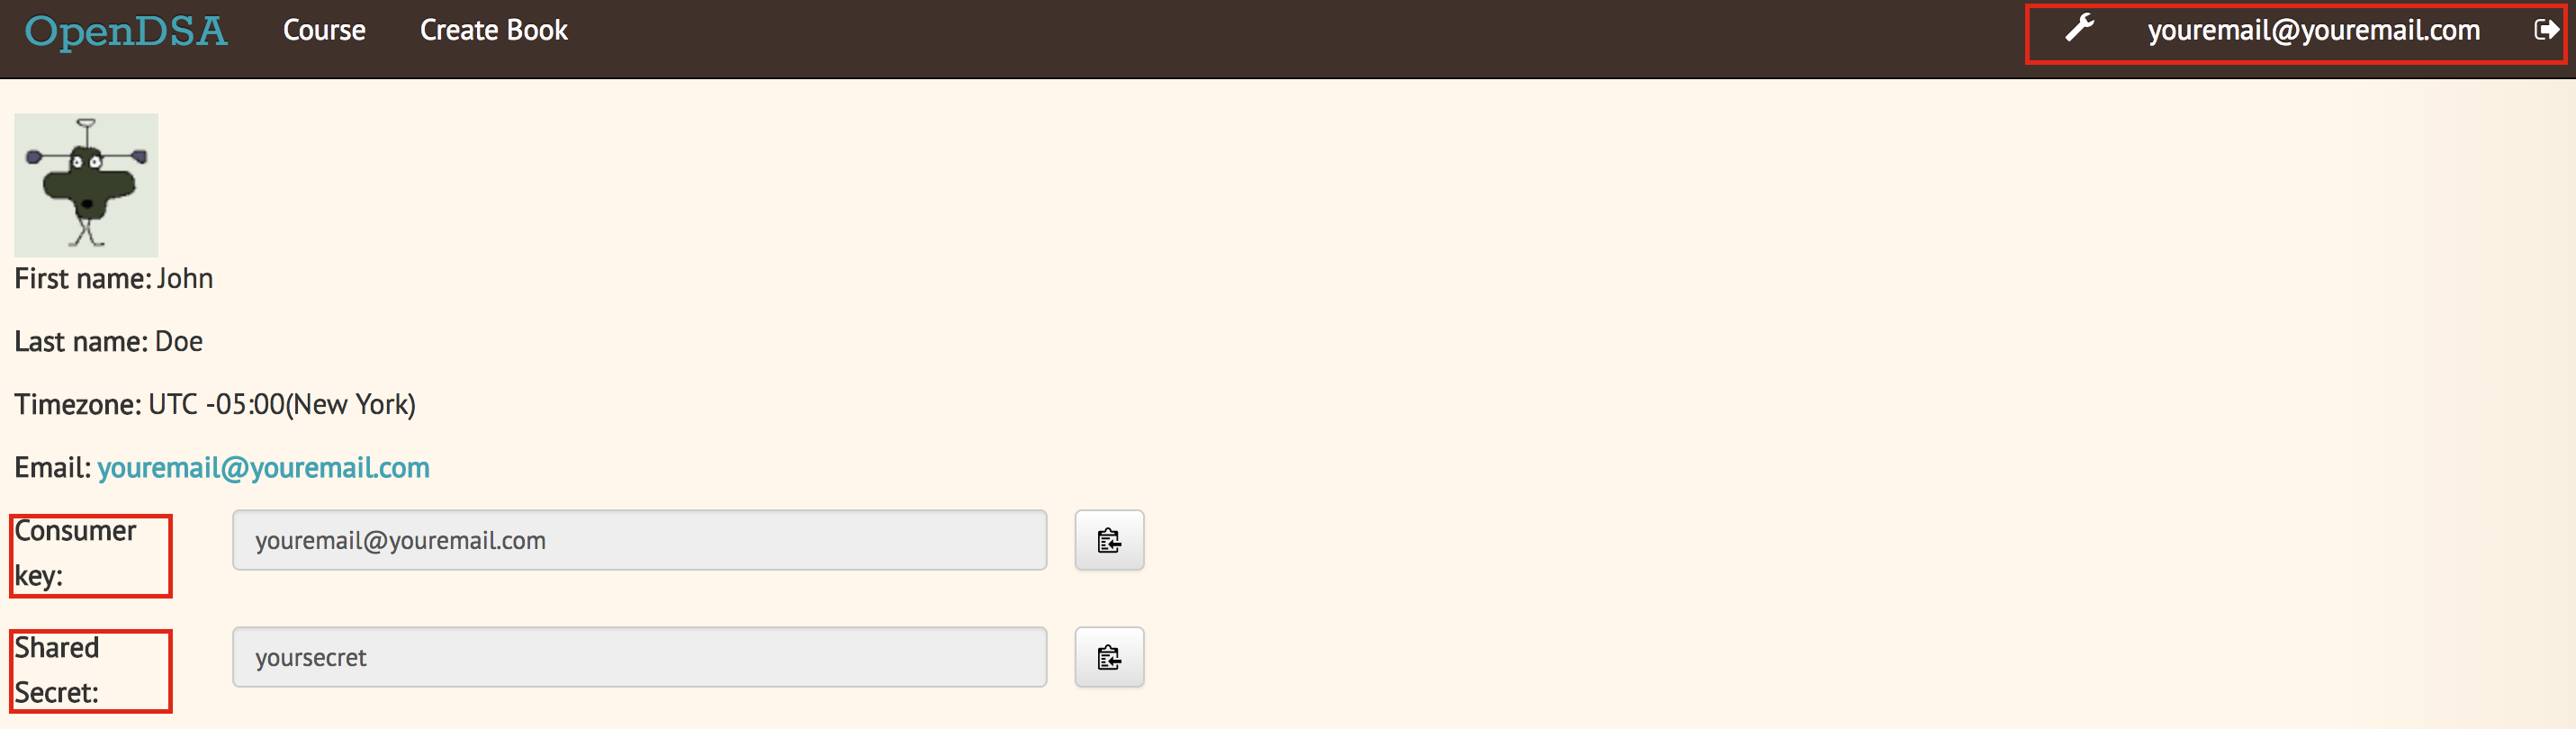
calculatorkey: 'FirstSecret'Once you share these unique keys and secrets with a tool consumer, it will be able to add your application like this:
If you create a new settings file, you need to create a variable that loads the content from your settings file. Add this line in config/application.rb
config.lti_settings = Rails.application.config_for(:lti_settings)
This variable will load the key and secret from your settings
file.The key/secret pair should be distinct for each tool consumer. If you knew that 10 different institutes/instructors want to integrate your tool into their courses, you might create 10 key/pairs.
Step 3: Along with a key and a secret, the tool consumer will also need a url where it can send a request. For that purpose, create a controller named lti with a launch endpoint (so the url can say '..../lti/launch' for readability). This launch endpoint will receive the post request from the tool consumer and we will validate and authenticate the LTI requests within this endpoint.
Step 4: When your app is launched from a Tool Consumer (such as Canvas), it will send a post request to your launch endpoint with a bunch of parameters. One of the received parameters in the request will be oauth_consumer_key. This key should be exactly the same as the one we defined in the settings.yml file. The first step in a request validation is to check whether this received key is present in your system. If the key is not present, then throw an error. Add the following code inside the launch endpoint for key validation:
          if not Rails.configuration.lti_settings[params[:oauth_consumer_key]]
            render :launch_error, status: 401
            return
          end
The code above checks if the key is present in the settings variable you created in step 2. If the key is not present, then redirect the user to launch_error page. We will create this page later in this tutorial.
Step 5:
If the key is present, then we move to the second step of
validation, which is to (1) check whether the request is a valid LTI
request, and (2) verify the authenticity of the Tool Consumer.
- To check if the request is a valid LTI request, we need to check if The POST request contains lti_message_type with a value of basic-lti-launch-request, lti_version with a value of LTI-1p0 for LTI 1, and a resource_link_id. If any of these are missing, then the request is not a valid LTI request.
- If this is a valid LTI request, then we need to validate its authenticity. An authentic LTI request will have oauth_signature along with the oauth_consumer_key . We have already validated in Step 4 if the key is present or not. The next step is to generate a signature from this key and its corresponding secret that we have stored, and compare it with oauth_signature. If the two signatures match, only then the request is valid.
          require 'oauth/request_proxy/action_controller_request'
          @provider = IMS::LTI::ToolProvider.new(
            params[:oauth_consumer_key],
            Rails.configuration.lti_settings[params[:oauth_consumer_key]],
            params
          )

          if not @provider.valid_request?(request)
            # the request wasn't validated
            render :launch_error, status: 401
            return
          end
Step 6: At this point, you have a valid and authentic LTI request. In our example, we store the user id and name in a session and redirect the user to use calculator application. To do so, add the following code below the code of Step 5.
          session[:user_id] = params.require :user_id
          session[:lis_person_name_full] = params.require :lis_person_name_full
          @lis_person_name_full = session[:lis_person_name_full]
          redirect_to calculator_path
Step 7: Now, if you try to register your application in Canvas, you will need XML configuration for your app. Therefore, you should create a page which provides XML configuration of your app. Following is the XML configuration of this calculator app. In our XML, we tell Canvas under lticm:options tag that we need our Calculator application on Course Navigation.
            <cartridge_basiclti_link
              xmlns="http://www.imsglobal.org/xsd/imslticc_v1p0"
              xmlns:blti = "http://www.imsglobal.org/xsd/imsbasiclti_v1p0"
              xmlns:lticm ="http://www.imsglobal.org/xsd/imslticm_v1p0"
              xmlns:lticp ="http://www.imsglobal.org/xsd/imslticp_v1p0"
              xmlns:xsi = "http://www.w3.org/2001/XMLSchema-instance"
              xsi:schemaLocation = "http://www.imsglobal.org/xsd/imslticc_v1p0
              http://www.imsglobal.org/xsd/lti/ltiv1p0/imslticc_v1p0.xsd
              http://www.imsglobal.org/xsd/imsbasiclti_v1p0
              http://www.imsglobal.org/xsd/lti/ltiv1p0/imsbasiclti_v1p0.xsd
              http://www.imsglobal.org/xsd/imslticm_v1p0
              http://www.imsglobal.org/xsd/lti/ltiv1p0/imslticm_v1p0.xsd
              http://www.imsglobal.org/xsd/imslticp_v1p0
              http://www.imsglobal.org/xsd/lti/ltiv1p0/imslticp_v1p0.xsd">
                <blti:title>Calculator</blti:title>
                <blti:description> Calculator  LTI Application</blti:description>
                <blti:icon></blti:icon>
                <blti:launch_url> http://localhost:3000/lti/launch
                </blti:launch_url>
                <blti:extensions platform="canvas.instructure.com">
                    <lticm:property name="privacy_level">public</lticm:property>
                    <lticm:options name="course_navigation">
                        <lticm:property name="url">
                        http://localhost:3000/lti/launch </lticm:property>
                        <lticm:property name="text"> Calculator </lticm:property>
                        <lticm:property name="visibility">public</lticm:property>
                        <lticm:property name="default">enabled</lticm:property>
                        <lticm:property name="enabled">true</lticm:property>
                    </lticm:options>
                </blti:extensions>
                <cartridge_bundle identifierref="BLTI001_Bundle"/>
                <cartridge_icon identifierref="BLTI001_Icon"/>
            </cartridge_basiclti_link>
Step 8:
Now, you have all the things required to register an application
on Canvas: key, secret and XML configuration.
After pasting your XML configuration along with key and a secret
in Canvas, you should see your application in course navigation.
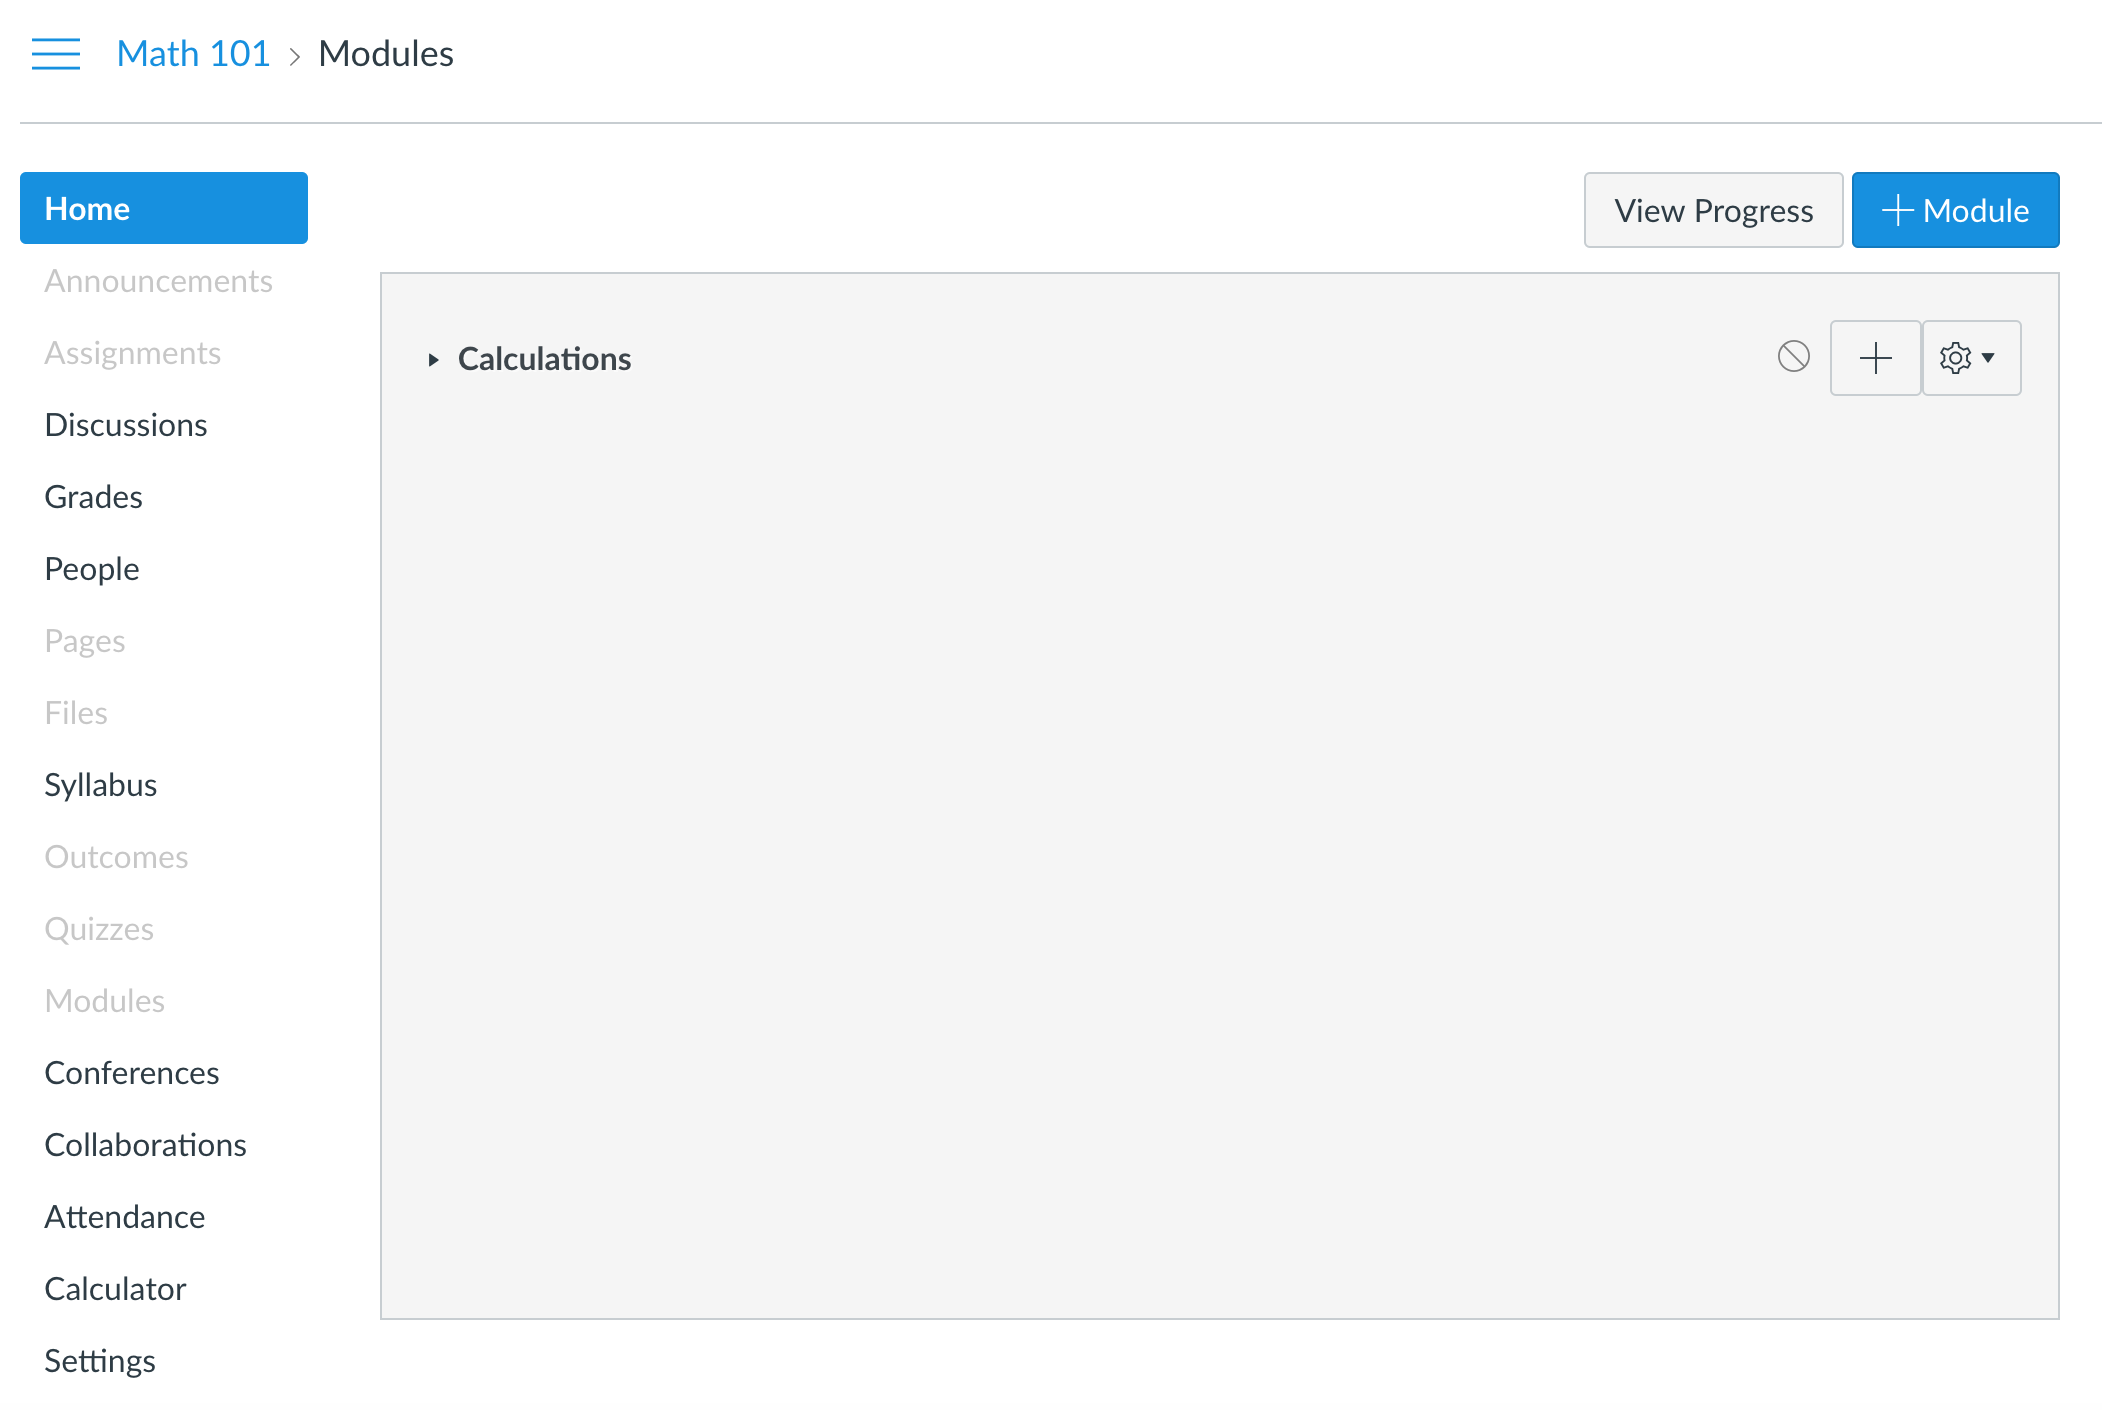
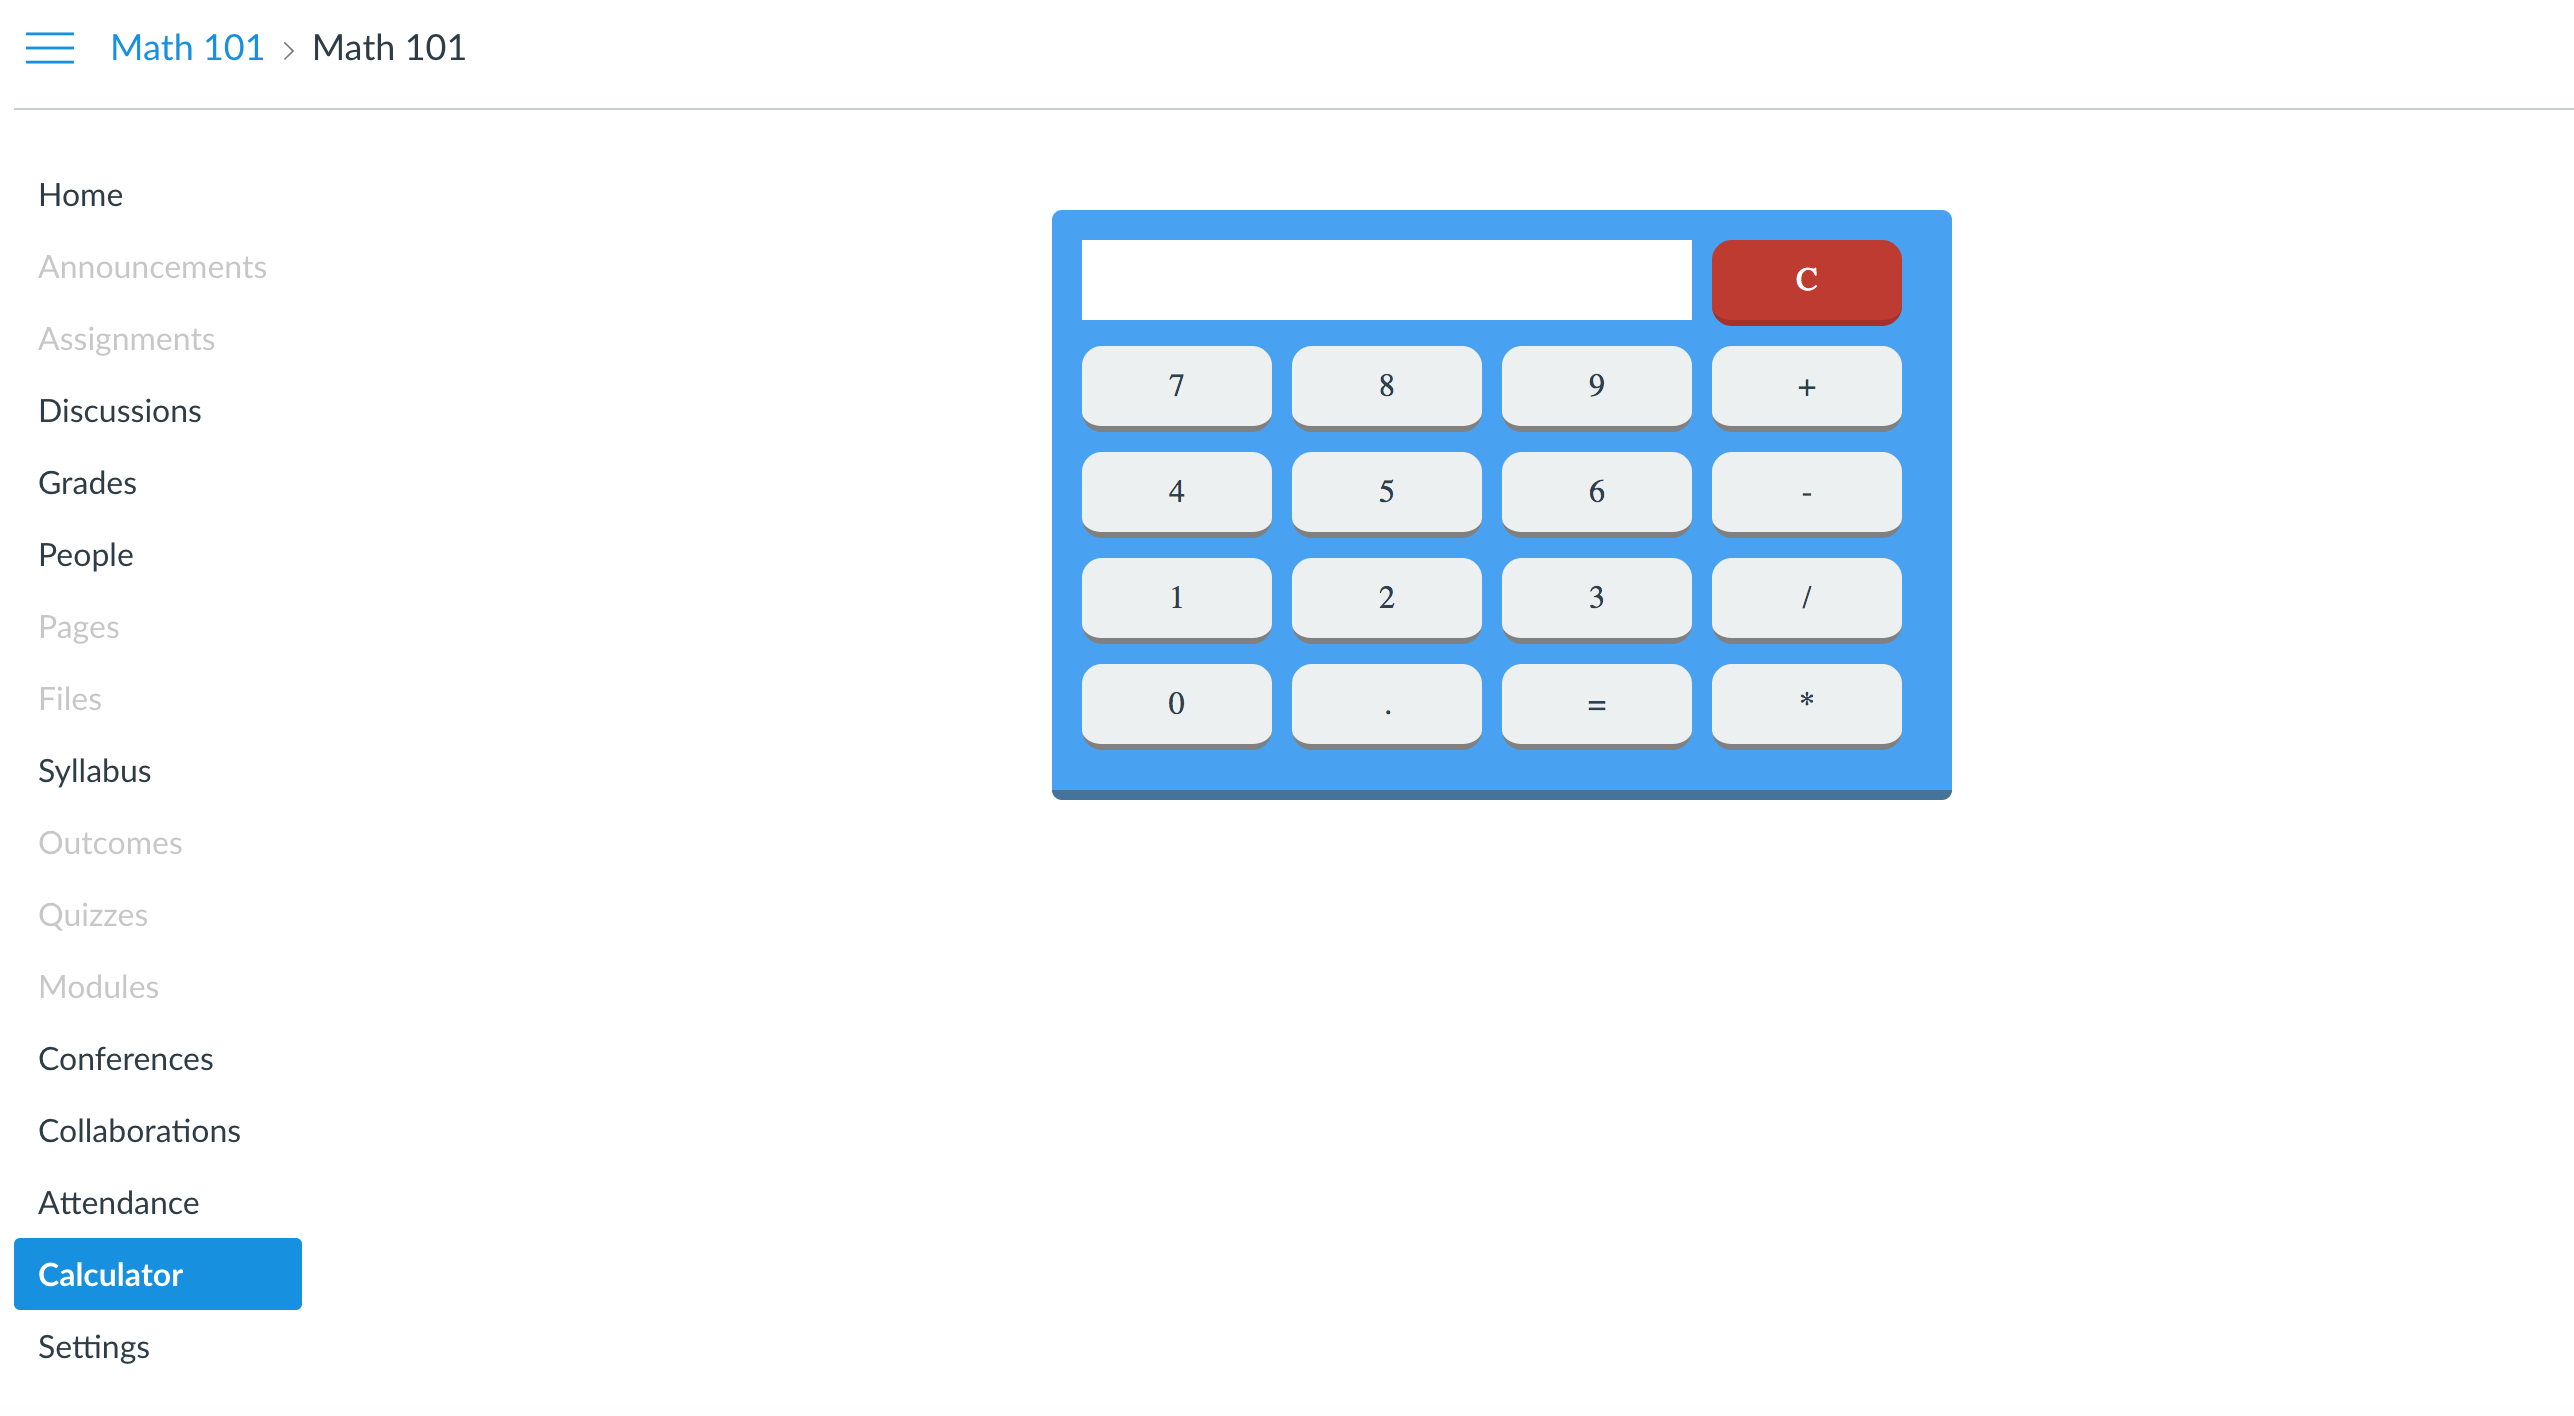
You can see here that the Calculator application is added above Settings in the navigation menu.
Step 9:
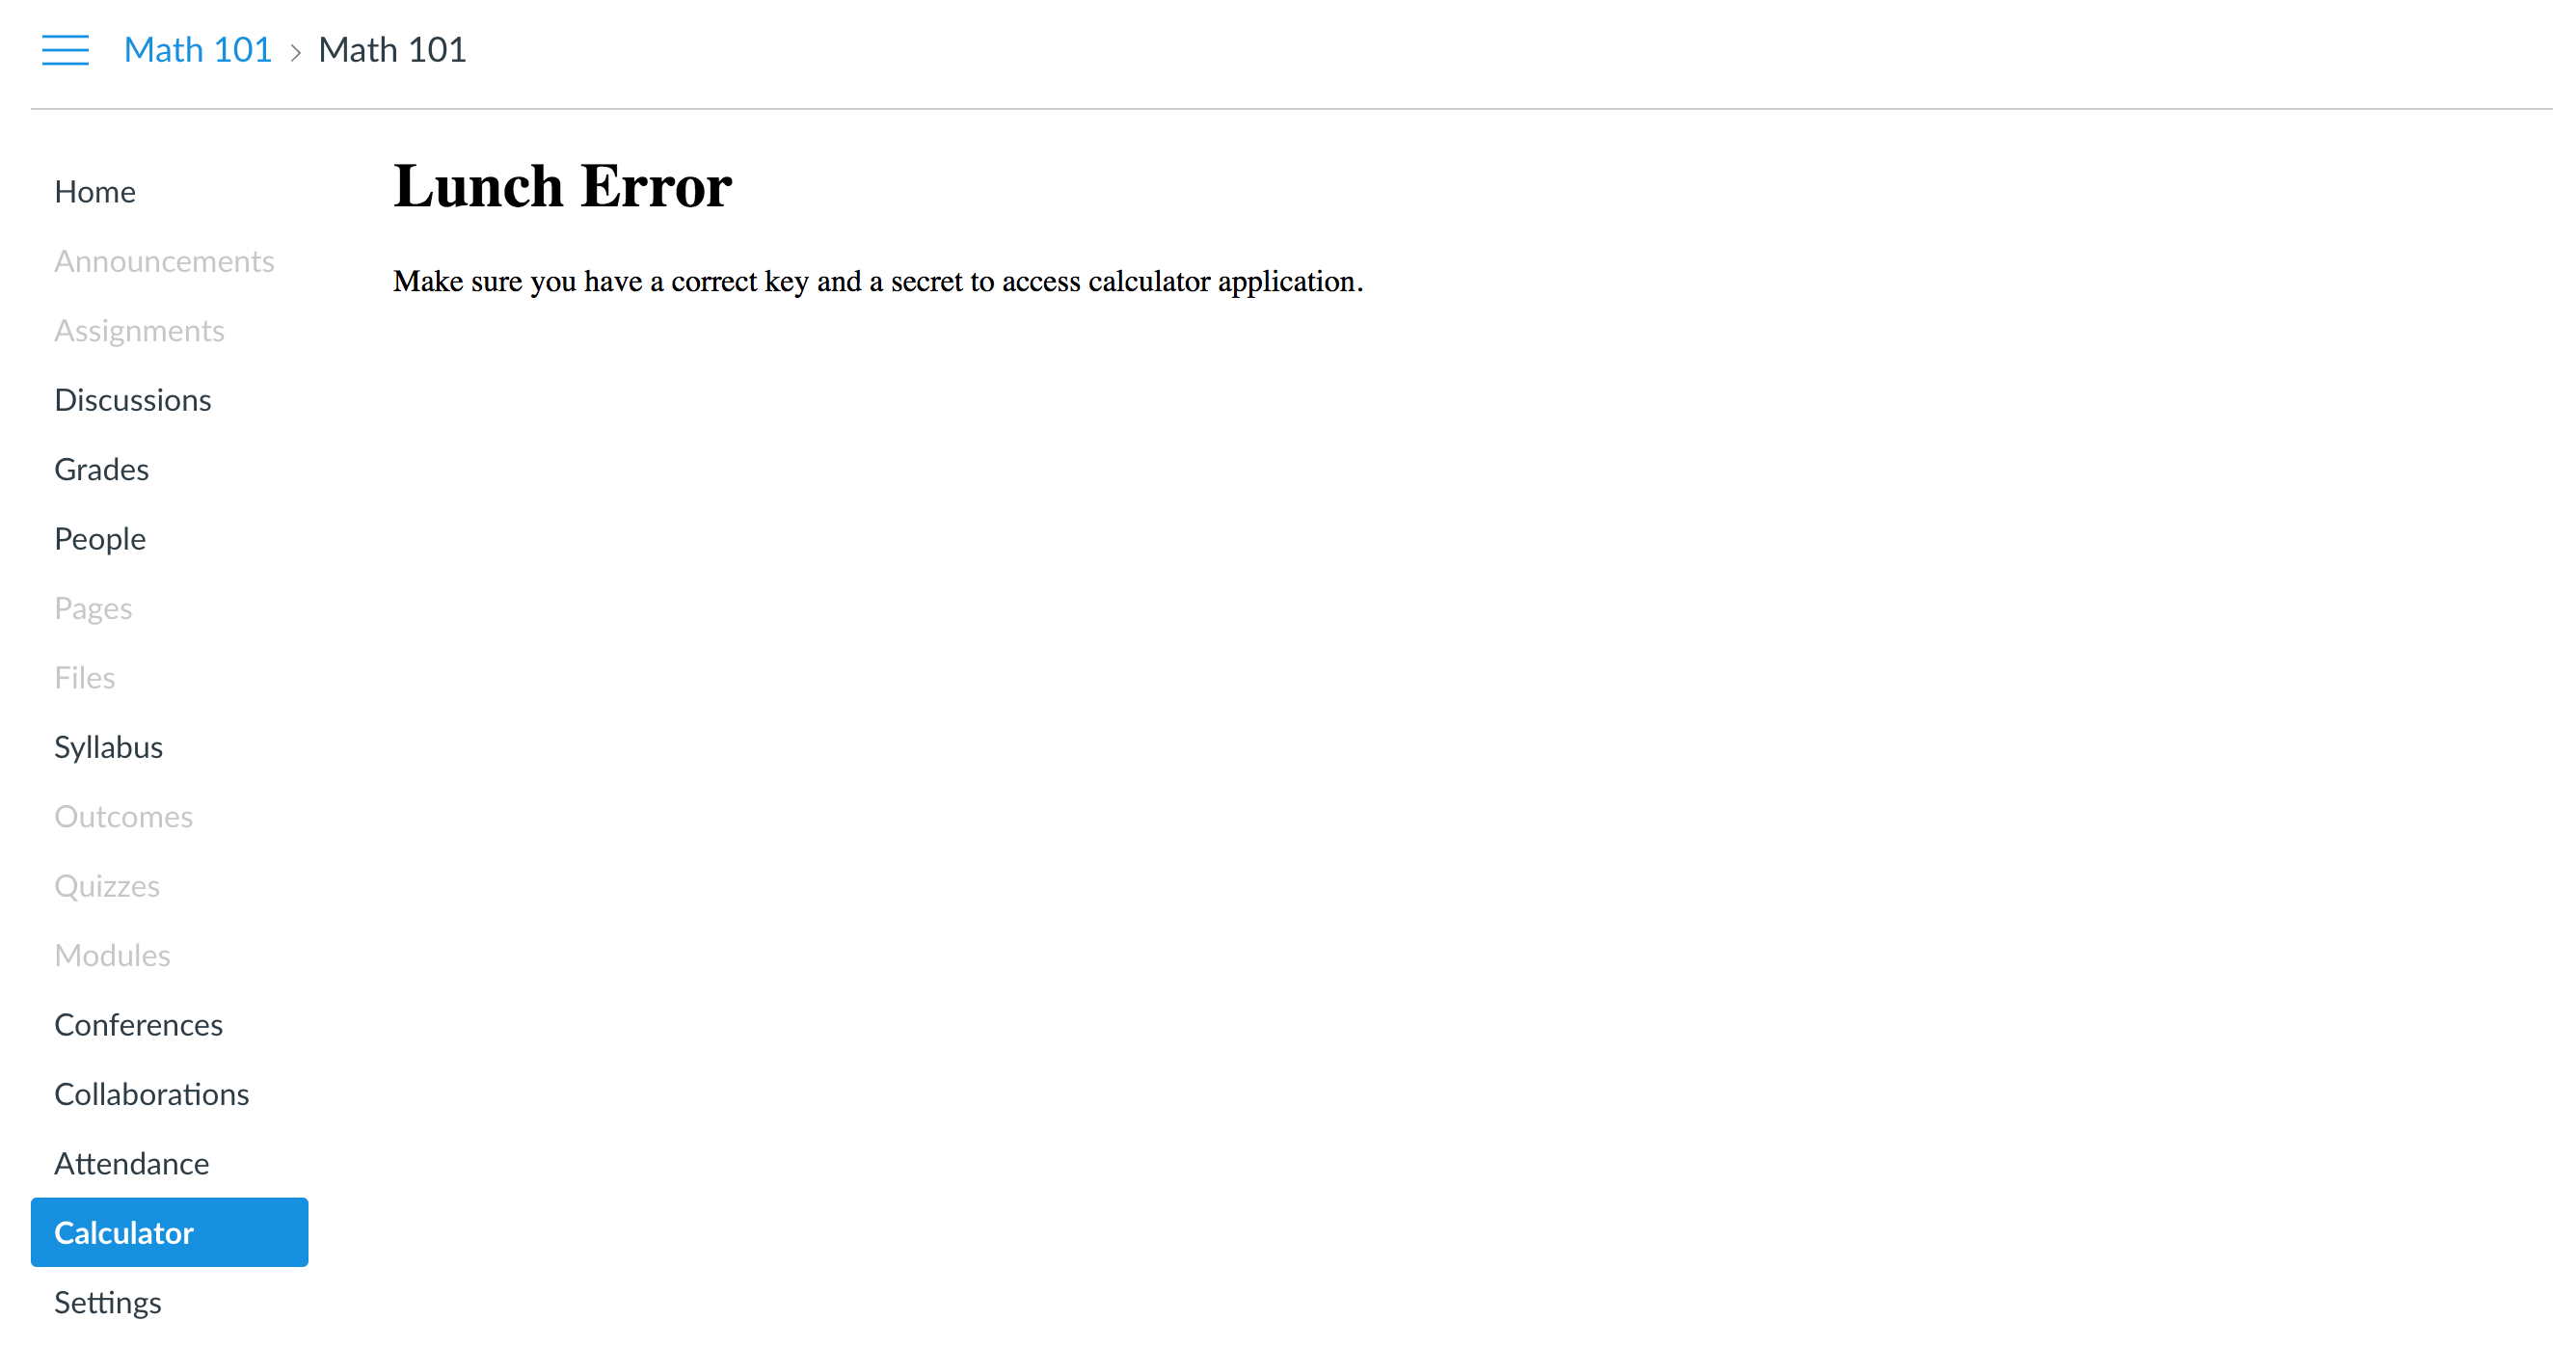
If you launch your application now, you will receive the
following error:
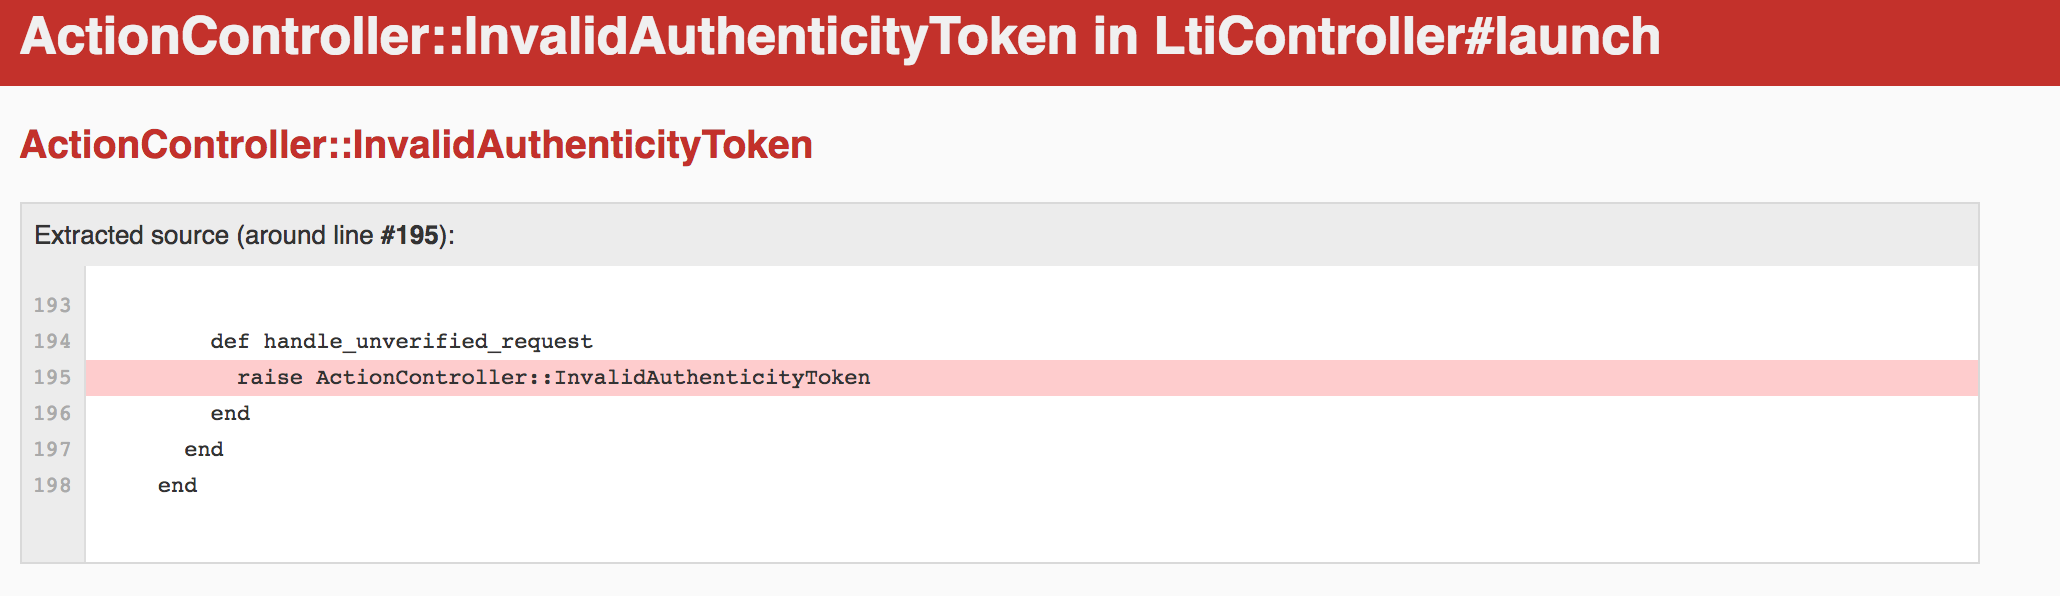
To fix this, you need to tell Rails that it does not need to verify user before launch request. Add the following line in the application controller.
skip_before_action :verify_authenticity_token, only: :launch
Step 10:
If you launch your application once again, you should see the
following warning if your application is not running on
HTTPS.
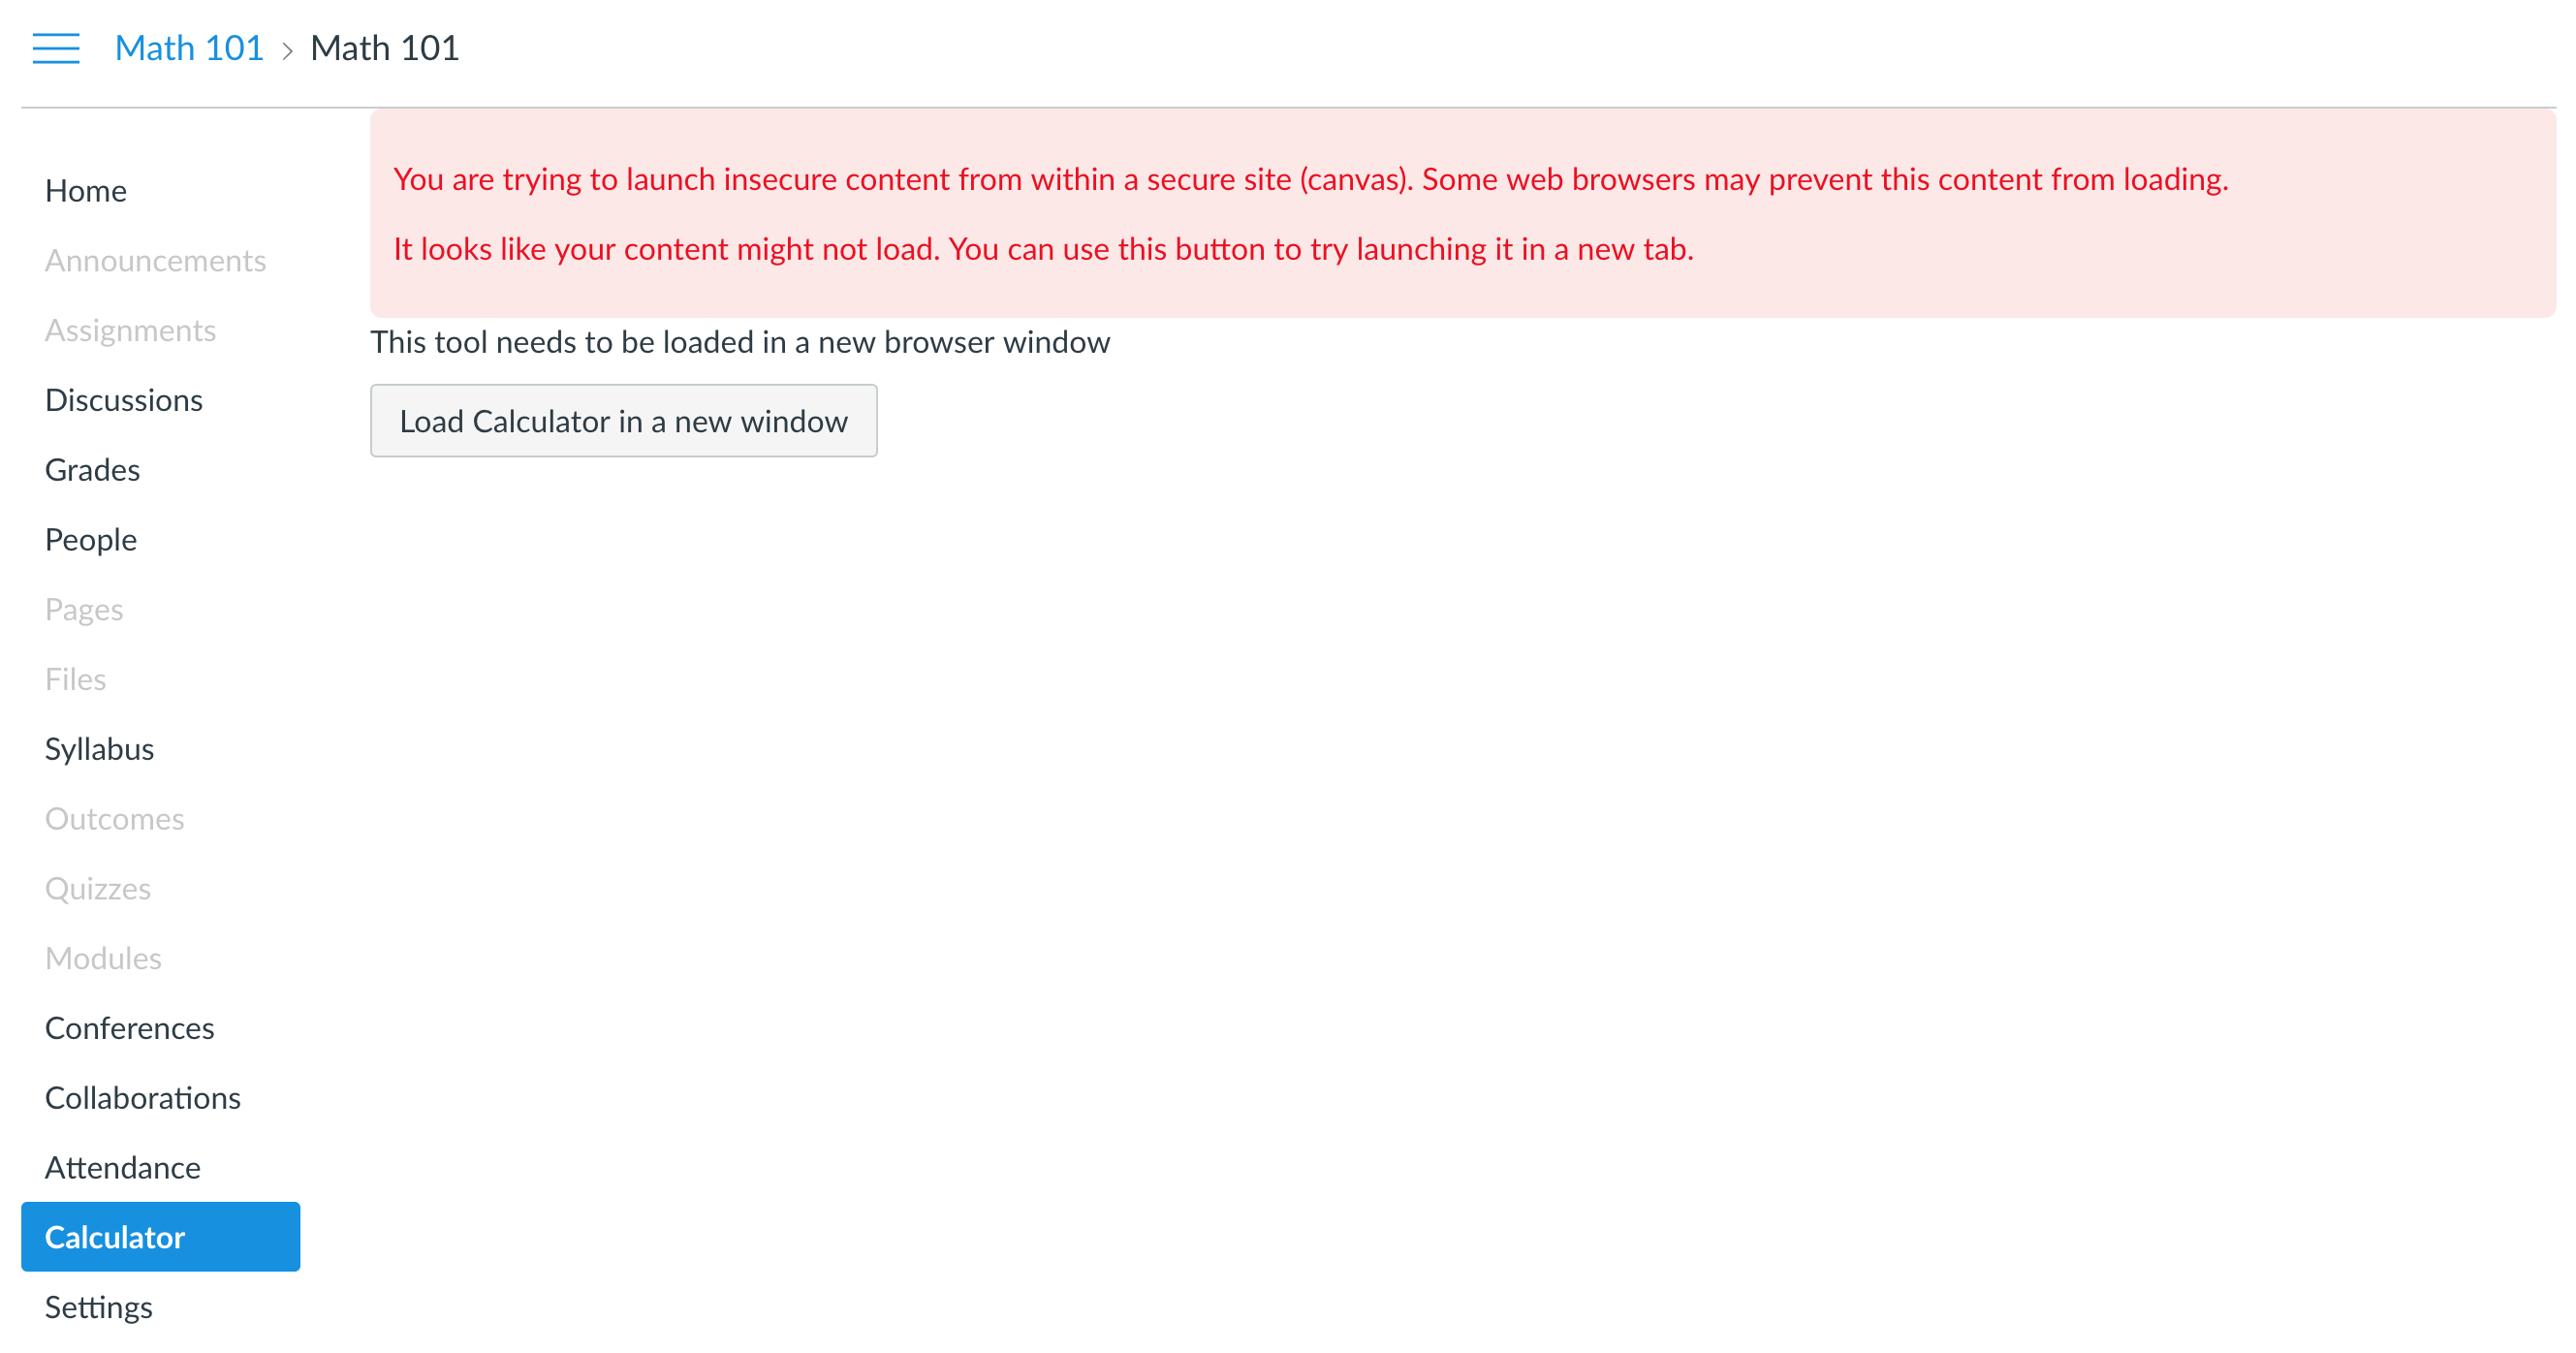
To add SSL certificate on localhost, follow the steps mentioned here.
Step 11: Now, delete your application from Canvas and update your config file with https launch URL and add your application again.
Step 12: Even now, if you launch your application from Course Navigation menu, you will not see anything and rather you will see the following error in your browser console:
          Refused to display 'https://localhost:3000/calculator' in a frame
          because it set 'X-Frame-Options' to 'sameorigin'.
You see this error because Canvas opens the LTI Tool in an iframe, but Rails does not allow the application to be embedded in an iframe by default. Therefore, you need to add the following code in the calculator controller.
          after_action :allow_iframe, only: [:calculator]

          def allow_iframe
            response.headers.except! 'X-Frame-Options'
          end
In the first line of the code, we tell rails to only allow one endpoint named calculator to open in an iframe.
Step 13: The last step is to update routes and also to create a launch_error page, because this is where we are redirecting the user if the request is not validated or authenticated. Create views/lit/launch_error.html.erb and add the following code to it:
Since Canvas will also open this launch error page in an iframe and we redirect to this page within the launch endpoint, we need to allow the launch endpoint to open in an iframe as well. Add the following code in lti controller.
          after_action :allow_iframe, only: [:launch]

          def allow_iframe
            response.headers.except! 'X-Frame-Options'
          end
Now, if the request received is not validated or authenticated, you will see the the following on Canvas:
          Rails.application.routes.draw do
            get 'lti/launch'
            post 'lti/launch'
            get 'calculator', to: 'calculator#calculator'
            root 'calculator#calculator'
          end
Once you are done with all these steps, and Canvas has a valid
key and a secret, then you should see your application working
in Canvas.
You can download the complete source code for a version of the calculator with LTI support.
Read our next tutorial to learn how to send scores back to a tool consumer.